

Standard Panel Model Pet Door Installation

Please read these instructions carefully and completely before attempting to install Hale Pet Doors; they will guide you through the steps and precautions needed for a door installation. Photos and illustrations have been added to help you to understand various instructions. In order to reach an experienced installer for free consultation, please call 1-888-293-6411. All Hale Pet Doors are designed for ease of installation and the Hale Standard Panel™ is ideal for most sliding patio doors. (Note: The standard panel will not work for either Pella or Anderson sliding doors as those doors do not have a track that the standard panel insert can be attached to. The pressure fitted Hale Omni Panel™ is ideal for those instead.) Any person with a working knowledge of power tools and basic home construction can install the Hale Pet Door™. It is important to note however, that the product warranty may be affected if returns have been modified in any way other than specified by these instructions. We cannot give credit for a door returned to us damaged.
A SAFETY REMINDER!
Always wear eye protection and gloves when appropriate.
Step 1: Before installation, be sure that you have the proper size pet door for your pet. If in doubt, larger is better. It may be harmful for your pet to use a pet door that is too small.
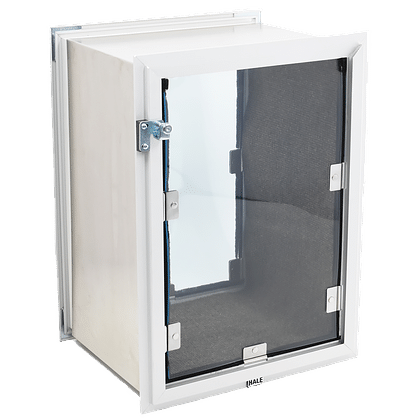
Step 2: Take a brief look at the large illustration of the Hale Standard Panel™ model at the end of the instructions and become familiar with various components of this panel model. This will not only help in understanding the terms used in these instructions but can be very useful should you need to call for technical support.
Step 3: Check the package you received to make sure it contains all the necessary parts.
Complete kit includes:
| Instructions | Warranty |
| 5/8″ #6 Phillips head screws | 7/64″ drill bit |
| Vinyl weather-stripping | King Starboard® or Lexan® security cover |
| Hale Standard Panel™ locking strip | Hale Standard Panel™ door lock |
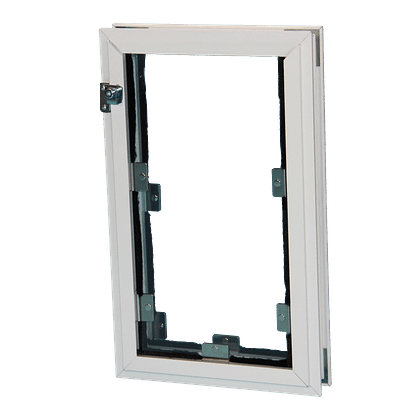
| Hale Pet Door™ Hale Standard Panel™ Model |
Tools you will need:
| Drill | #2 Phillips screwdriver |
| Hacksaw | 7/64″ drill bit (included) |
| Tape measure | #6 Sheet metal screws (included) |
| Glass cleaner and paper towels |
 Step 4: Lay down drop cloths on both sides of the door for easier cleanup after installation.
 Step 5: Clean the glass in the patio door. When the pet door insert is installed there will be some overlapping of the slider panel and the stationary panel. This is nearly impossible to clean without removing the pet door insert, so cleaning it before installation will save time and trouble. (see figure 1)
Step 6: The customer must decide whether they want the pet door insert on the slider (opening) side, or on the stationary side of their patio door. It is easier to install on the slider side, but may necessitate moving alarm sensors if there are any present. (see figure 1). If there are sensors the customer should consult with their alarm company on moving them. If the patio door has a keyed lock, installing the pet door insert on the slider side will prevent use of this type of lock.
Step 7: If you are installing on the slider side, skip this step. Locate and remove any securing screws or brackets that may be holding the stationary panel to the doorjamb. (see figures 2 and 3). Slide the stationary panel over far enough to give you room to work.

Step 8: Measure the height of the patio door frame from the top of the wheel track to the inside top of the door channel. (see figures 4 and 5).

Step 9: Measuring carefully, mark the side rails of the pet door panel unit to cut it to the proper height. Cut the rails to the proper length with a hacksaw or reciprocating saw. (see figure 6).
 |

|
 Step 10: Place the panel unit insert into the door track to see how it fits. If you are installing on the stationary side, push the stationary panel up tight against the panel and check for gaps. If you are installing on the slider side, close the slider up tight against the panel and check for gaps. Any gaps between the edge of the slider and the panel unit insert should be covered when the lock strip is installed. If you still see gaps due to a crooked door frame after installing the lock strip, you may be able to close them by leaning the pet door insert one way or the other. If this doesn’t work, you may wish to apply foam-tape type weather-stripping (available at any hardware store) to the side rail of your pet door insert.
Step 11: The panel unit should be pulled tight against the door jamb lip to allow you to screw the pet door insert into place. (see photo). Note: The side rails of the pet door insert are notched at the bottom to allow it to straddle the wheel track in the door jamb, but it does not have to do so! It may be necessary to set the pet door insert on top of the wheel track in order to pull it in tight enough to screw it to the lip. (see figure 7).

If there is not enough of a lip to screw through, the pet door insert can be secured in place with silicone caulk. NOTE: If you do secure the insert with caulk, the pet door or the patio door SHOULD NOT BE USED FOR AT LEAST 24 HOURS. Using either door too soon will move the pet door panel before the silicone has set up. |
 |
Step 12: Once you are satisfied with the placement of the pet door panel, loosen the large Phillips head screw at the top edge of the insert. There are three on each edge of the insert, but only one of the top ones needs to be loosened. This will enable you to move the sliding panel up to close the gap at the top. (see figure 6) One or two turns to loosen the screw should be enough. Push the slide panel up tightly into the door channel. Tighten the screw back up to hold the sliding panel in place.
Step 13: Drill holes through the face of the door channel and into the panel insert. Screw the panel unit into the door frame. Use the included #6 sheet metal screws. Two screws at the top, two at the bottom and one or two in the side rail should be sufficient. DO NOT place the screws too close to the glass in the patio door. If you strike the edge of the glass with a drill bit or screw it will shatter. (see figure 8).

If you are installing on the stationary side, steps 14-16 may not be necessary
Step 14: Study figure 9. The top of the drawing is facing the inside of the house. Cut the lock strip to a length which will allow you to screw it to the leading edge of the slider. You want the lock strip to be as long as possible without scraping the door frame. When you close the slider, the lock strip should close around the edge of the pet door panel.

Step 15: Make sure the lock strip is facing the right way. (see figure 9) The latch bar needs to be inside the house. This is what the lock will latch onto. Screw the lock strip to the leading edge of the slider. Again, be very careful installing the screws! If a drill bit or screw hits the glass it will shatter.
 Step 16: Attach the included patio door lock unit to the panel unit insert. Test to make sure the patio door slides and locks.
Step 17: If there are any gaps when the door is closed fill them with foam tape. NOTE: If you installed on the stationary side and DID NOT previously install the lock strip, you can install it to help close any gaps if necessary. You may also choose to install the door lock or use screws to fill the lock holes in the pet door panel.
Step 18: Cut the vinyl weather-stripping (included) to length with scissors. Remove the protective paper off the double sided tape and press firmly into position. Apply the vinyl weather-stripping to the back edge of the slider or the front edge of the stationary panel. This will eliminate the gaps created by overlapping glass between the slider and stationary panels. (see figure 1).
Step 19: If you removed any brackets or screws from the stationary side when beginning your install, replace these now.
Step 20: If you ordered a translucent gray Lexan® security cover for your pet door, peel the protective covering from the cover and set it aside for a couple of hours before installing it into the front frame. A drying period will prevent the inner flap from sticking to the newly uncovered Lexan®. If you ordered any color of the King Starboard® security cover, there will be no protective covering over it but you still may wish to let your door set without the security cover in place for a few hours to avoid any sticking. The cover will slide easily into place in the built in frame and can be easily locked and unlocked with the positive action pin bolt lock. Remove the drop cloths and clean up the area.
You have now completed the installation of your new Hale Pet Door™. We hope you and your pet enjoy the new investment you have made in your home!

