

Omni Panel Pet Door Installation


Please read these instructions carefully and completely before attempting to install Hale Pet Doors; they will guide you through the steps and precautions needed for an Omni panel installation. Illustrations and pictures have been added to help you understand various instructions. Hale Pet Doors are designed for ease of installation and are ideal for most sliding patio doors. However, at any time during installation if you are in need of some technical assistance, you can reach an experienced installer for free consultation at 1-888-293-6411. Do not make any cuts or modifications to the Hale Omni Panel™ Insert. This may invalidate the warranty.
A SAFETY REMINDER!
Always wear eye protection and gloves when appropriate.
Step 1: Before installation, be sure that you have the proper size pet door for your pet. If in doubt, larger is better. It may be harmful for your pet to use a pet door that is too small.
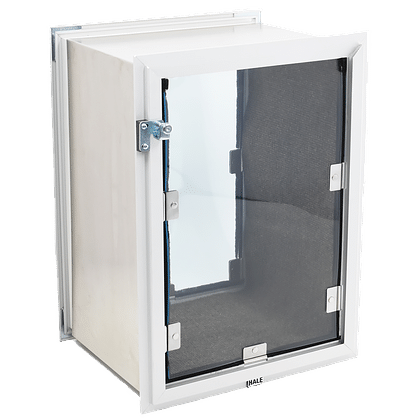
Step 2: Take a brief look at the large illustrations of the Omni panel at the bottom of this page and figure 1 on the next page and become familiar with the various components of this pet door model. This will not only help in understanding the terms used in these instructions, but it can be very useful should you need to call for technical support.
Step 3: Check the package you received to make sure it contains all the necessary parts.
Complete Kit includes:
| Instructions | Warranty | Foam tape |
| Bar Lock | Wrench | Vinyl weather-stripping |
| Hale Omni Panel™ Insert | Omni Panel Extension | Starboard® or Lexan® Security Cover |
| Two strips of gray pile weather-stripping | Thermal Bond rubber seal |
Step 4: The sliding glass doors will overlap once the installation is complete. Before you begin installation, clean this area of glass as it will be difficult to reach later. (Figure 5)
 |
 |
 |
 |
Step 5: Determine with the customer on which side of their patio door they want to install the Omni Panel. The stationary side is preferred, but the sliding side is slightly easier.
NOTE: If decided on the stationary side, there are usually some screws on the inside securing the stationary panel to the door jamb. (Figure 3) There may also be securing brackets on the outside of the stationary panel. (Figure 4)


If installing in the sliding side, skip steps 6, 11, and 12.
Step 6: Remove the securing screws and brackets, and slide the stationary panel over.
 Step 7: Unroll the strips of fuzzy gray pile weather- stripping and feed them into the channel running the length of the Hale Omni Panel™ Insert. There is a channel on both sides of the Hale Omni Panel™ Insert. Apply the pile weather-stripping to both sides. Start at the bottom of the OMNI and push the end of the pile weather-stripping into the channel. Gently push up to feed the entire roll into the channel. You may want to tug gently with a pair of needle-nosed pliers. The weather-stripping will fill the entire channel except for about 4″ at the top. If you are going to use the OMNI extension (see step 8), you need to leave the pile weather-stripping off that side. There is also a packet of Thermo Bond rubber seal weather-stripping that goes at the top of the channel. These are to cover the adjusting screws. (Figure 2 C)

 Step 8: Set the Hale Omni Panel™ Insert into the door track. If the track is deep enough to interfere with the pet door frame, see the supplemental instructions titled “using the OMNI extension”.
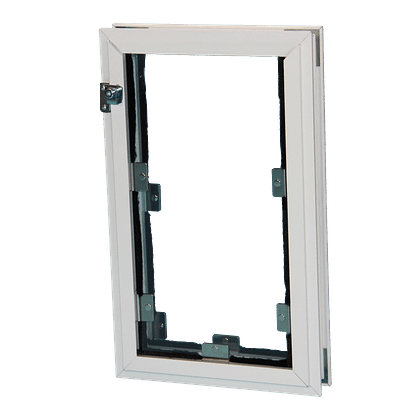
Step 9: With your hand, push the “U” channel (Figure 2 E) up securely into the top of the track (Figure 2 Door Channel). Pull the sliding plate (Figure 2 B) down to expose the adjusting nuts. (Figure 2 A)
 Step 10: Tighten the adjusting nuts with your fingers. Slide the stationary panel over tight against the Hale Omni Panel™ Insert (or close the sliding door if you are installing on the sliding side) and inspect for gaps. To close any gaps, the Hale Omni Panel™ Insert can be adjusted by tightening or loosening one adjusting nut. This should cause the Hale Omni Panel™ Insert to lean slightly one way or the other. Once you are satisfied with the insert placement, tighten the adjusting nuts with the wrench provided.
Step 11: Slide the stationary panel away from the Hale Omni Panel™ Insert so you can access the edge of the Hale Omni Panel™ Insert.
Step 12: Slide the short piece of fuzzy weather-stripping (Figure 2 D) up to expose the adjusting screws (Figure 2 C). There are adjusting screws on both edges of the Hale Omni Panel™ Insert, but you only need to deal with the screws on one edge. Do not worry about the screws on the inaccessible edge! Loosen both preset screws one or two full turns. Loosening them too much may cause the slide plates (Figure 2 B) to fall out. Push the slide plates up until they stop. Tighten the adjusting screws. Slide the short piece of fuzzy weather-stripping back down to cover the adjusting screws. There will be a gap above the fuzzy weather-stripping between the edge of the panel and the edge of the adjustment unit. Cover it with a piece of foam tape (included).

Step 13: Slide the stationary panel back up against the Hale Omni Panel™ Insert. You may wish to re-install any securing screws or brackets at this time. If you move the securing screws to a new location, BE VERY CAREFUL THAT YOU DO NOT HIT GLASS when screwing them in.
Step 14: You are now ready to install the 1 7/8″ black vinyl weather-stripping to the back edge of the slider or the front edge of the stationary panel to seal the now-existing gap. (Figure 5) Cut the vinyl weather-stripping to the proper length with scissors. Peel the protective paper off the double sided tape and press firmly into position.

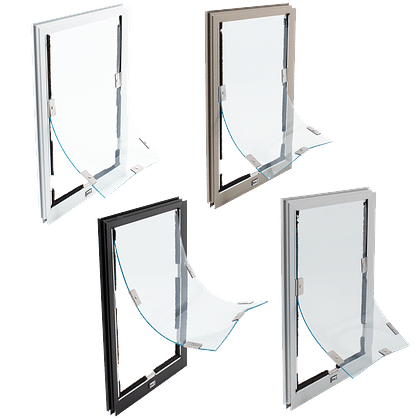
Step 15: If you ordered a translucent gray Lexan® security cover for your pet door, peel the protective covering from the cover and set it aside for a couple of hours before installing it into the front  frame. A drying period will prevent the inner flap from sticking to the newly uncovered Lexan®. If you ordered any color of the King Starboard® security cover, there will be no protective covering over it but you still may wish to let your door set without the security cover in place for a few hours to avoid any sticking. The cover will slide easily into place in the built in frame and can be easily locked and unlocked with the positive action pin bolt lock. Remove the drop cloths and clean up the area.
Step 16: Clean the glass in the panel to remove any installation residue or fingerprints. If needed, you can also clean the flaps of the pet door with any standard ammonia free window cleaner. If you are installing the Hale Omni Panel™ Insert on the stationary side, you are done. If you are installing on the sliding side, proceed to the lock bar instructions below.
Installing the sliding lock bar
(CAUTION) Drilling holes for installing with screws may result in damaged or fractured glass. Hale Pet Door™ will not be responsible for damage resulting from the use of screws for installing the door lock. Hale Pet Door™ has provided a special double adhesive tape for holding the lock into position.
 1. Choose an area approximately midway between the top and bottom of the Hale Omni Panel™ Insert. Clean the area inside the door channel and the back of the sliding door. Make sure the areas are dry. Measure from the bottom of the sliding door track and place a pencil mark in the vertical door channel. Repeat this step and mark the back edge of the sliding door. These marks are where you will install the sliding lock bar. (Figure 6)

2. Peel the protective paper from the double stick tape on the back of the sliding lock bar. Make sure the thumb release is aligned upwards and press the lock bar into the door channel. (Figure 7) Peel the paper off the back of the receiver and press it very firmly onto the back of the sliding door.
 Using the OMNI Extension
1. An extension the length of your Hale Omni Panel™ Insert has been included in case the door channel is so deep that it interferes with the installation of the Hale Omni Panel™ Insert. The extension is attached to one edge of the OMNI™ when it is packaged. If the extension is not needed it will slide off. If the extension is on the wrong edge, slide it off and put it on the other edge. (Figure 8)
2. There are also two small pieces of Thermo Bond rubber seal weather-stripping included. These are for filling in any gap at the top of the extension. (Figure 8) Once you are satisfied with the extension, continue with step 5 of the main installation instructions.

