


French Door Model Pet Door Installation
Please read these instructions carefully and completely before attempting to install your pet door; they will guide you through the steps and precautions needed for a French door installation. Illustrations have been added to help our customers understand various instructions. To reach an experienced installer for free consultation, please call 1-888-293-6411. Hale Pet Doors are designed for ease of installation and their self-framing design makes them ideal for French door installation. Any person with a working knowledge of power tools and basic home construction can install the Hale Pet Door™. It is important to note however, that the product warranty may be affected if returns have been modified in any way other than specified by these instructions. We cannot give credit for a door returned to us damaged.
A SAFETY REMINDER!
Always wear eye protection and gloves when appropriate.
PLEASE READ ALL INSTRUCTIONS COMPLETELY BEFORE BEGINNING INSTALLATION.
NOTE REGARDING FRENCH DOORS: A “true French door” is a door with several individual panes of glass. There are also doors very much like a French door that have one big pane of glass called single lite doors. This model of pet door IS NOT usable for a single lite door. We do have an “in glass” model available in some areas for that type of door but it requires replacing the entire pane of glass. Some single-light doors are made to look like true French doors. If you are not sure, look for an engraved glazier’s mark in the corner of the panes. If there are many panes but only one glazier’s mark you are probably dealing with a single-light door. Take the time to make certain. Some single-light doors are almost indistinguishable from a true French door.
Also, whenever you install in a French door, consider whether or not the door handle would interfere with the operation of the security cover. If you have already installed the pet door and discovered that the handle is interfering, please call 1-888-293-6411 for technical assistance.
DETERMINE THE TYPE OF FRENCH DOOR INSTALLATION NEEDED: There are three types of French door installation. You will need to determine which type is right for your door before ordering. Use the information and pictures below to help determine what type of installation you need.
· An F-1 consists of removing one pane of glass and installing a custom size pet door in that opening. This typically means first measuring for the door and installing after ordering a custom size door in the appropriate color. Measure the visible glass width by height. This is your rough opening (R.O.).
· An F-2 consists of removing one pane of glass and cutting down or over (or both) into the body of the door. This can usually be done with an in-stock standard size Hale Pet Door.
· An F-3 consists of removing one or more panes of glass and partially replacing one pane. We call this partial pane an infill. This will usually be done with clear acrylic (Plexiglas). This can be either a custom or standard size door but will also require additional materials (Plexiglas, or other infill material).

Step 1: Before installation, be sure that you have the proper size pet door for your pet. If in doubt, larger is better. It may be harmful for your pet to use a pet door that is too small. A good general rule is to install the pet door so that the distance from the floor to the top of the passage opening is even or above the shoulder of your largest pet. If you have more than one pet, make sure the tallest pet have shoulder clearance and the shortest pet will not have to jump through the opening. Make sure you have the proper size door for your application. Many French doors require a custom size pet door.
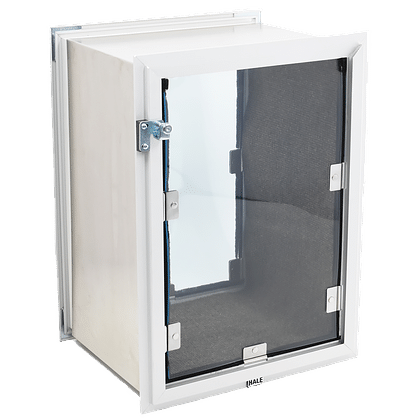
Step 2: Take a brief look at the full page illustration of the door model and become familiar with various components of the door model. This will not only help in understanding the terms used in these instructions but can be very useful should you need to call for technical support.
Step 3: Check the package you received to make sure that it contains all the necessary parts.
Complete Kit includes:
| Instructions Warranty 7/64” drill bit |
Hale Pet Door™ Door Model Starboard Security Cover 5/8” #6 Phillips Head Screws |
Tools you might need:
| Razor knife 2 Putty Knives Chisel Flat Bar Drill Reciprocating saw |
Level Drop cloths Circular saw with diamond blade Finishing nail Hammer |
Step 4: Lay down drop cloths on both sides of the door for easier cleanup after installation.
NOTE: EACH OF THE THREE TYPES OF FRENCH DOOR INSTALLATION IS SLIGHTLY DIFFERENT. FIND THE CORRECT SECTION FOR YOUR DOOR AND FOLLOW THOSE INSTRUCTIONS.
F-1 French Door Basic Installation
 Step 5: First, find the removable molding that is holding the glass in the French door. (IF YOUR FRENCH DOOR DOESN’T HAVE REMOVABLE MOLDING, PLEASE CALL TECHNICAL SUPPORT FOR HELP). Removable molding can usually be identified by staples or nail heads. If the molding has been painted over or you can’t find staples or nails, try sliding a putty knife under the molding.
Step 6: After identifying the removable molding, with care, use a razor knife to cut along the back edge of the molding to free it from the door. This cuts the paint or finish on the door to allow for easier removal.
Step 7: Loosen the molding with a putty knife. To remove the molding, slide one putty knife under the molding. Slide the other putty knife on top of the first one. Slide a standard screwdriver, chisel, or flat bar between the putty knives and twist carefully. This should loosen the molding enough to use the chisel or screwdriver to pry the molding off. Be careful not to break the pane of glass.
| Step 8: After removing all the necessary molding, make sure all the nails or staples have been removed and push the glass out carefully. The glass is usually glued in place, but with patience and care, it can usually be removed without breaking. Loosen it from the outside by going around it with a putty knife or other appropriate tool. Then use a putty knife, chisel, or screwdriver to pry the glass out. Save the glass and molding for re-installation later if desired. It is a good idea to wrap the removed pane of glass in cardboard and tape it closed. Tape the removed molding to the cardboard and label the cardboard (i..e. glass from dining room French door). |  |
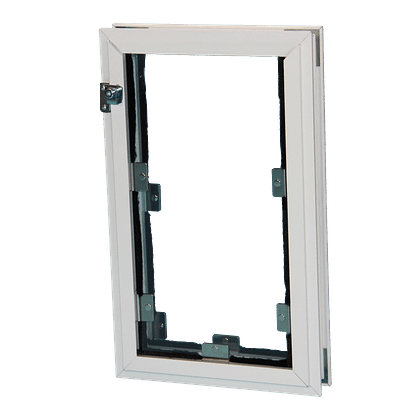
| Step 9: Separate the pet door into its two halves. Place the inner frame of the pet door (the side with the security cover tracks) in the rough opening from the inside of the house. Install the outer frame on the outside of the door to sleeve together to the inner frame. You should be able to snap the two frames together. |

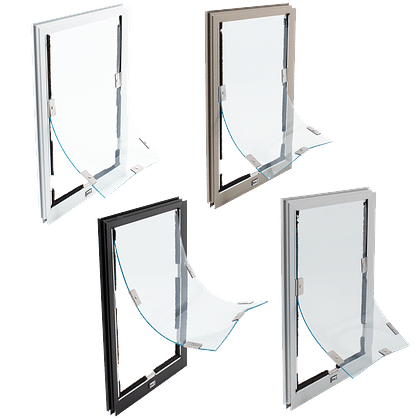
 Optional Step: If you choose to use the raincap for your door installation, attach it to the outer frame as shown in the graphic and picture to the left. It should simply hook onto the top of the outer frame. Then snap the frames together as stated above in Step 9.
Step 10: Using the pre-drilled pilot holes in the pet door frame and the supplied drill bit, drill one hole into the French door with the supplied drill bit through the inside edge of the outside frame at the bottom. BE CAREFUL NOT TO BUMP ANY OTHER PANES OF GLASS WITH THE DRILL BIT. Insert and loosely tighten one screw. Make sure the door is level and adjust if needed. When door is level, tighten the inserted screw and repeat drilling and inserting the rest of the screws in the pet door frame.
Step 11: The King Starboard® security cover will slide easily into place in the built in frame and can be easily locked and unlocked with the positive action pin bolt lock. Remove the drop cloths and clean up the area.
F-2 French Door Basic Installation
 Step 5: First, find the removable molding that is holding the glass in the French door. (IF THE FRENCH DOOR DOESN’T HAVE REMOVABLE MOLDING, PLEASE CALL TECHNICAL SUPPORT FOR HELP). Removable molding can usually be identified by staples or nail heads. If the molding has been painted over or you can’t find staples or nails, try sliding a putty knife under the molding.
Step 6:After identifying the removable molding, with care, use a razor knife to cut along the back edge of the molding to free it from the door. This cuts the paint or finish on the door to allow for easier removal.
Step 7: Loosen the molding with a putty knife. To remove the molding, slide one putty knife under the molding. Slide the other putty knife on top of the first one. Slide a standard screwdriver, chisel, or flat bar between the putty knives and twist carefully. This should loosen the molding enough to use the chisel or screwdriver to pry the molding off. Be careful not to break the pane of glass.
Step 8: Mark the body of the French door where you will be cutting. Do NOT cut closer than four inches from the side or bottom of door (some doors require leaving even more wood than this). Doing so will structurally weaken the door.
Step 9: Drill out the corners first and then finish cutting out the rough opening. If you ordered one of our standard pet door sizes, use the chart below to find the measurements of the rough opening required for your door. If you ordered a custom size pet door, you should have supplied us with the rough opening measurements. Use those same numbers when marking and cutting.
| Pet Door Size | Rough Opening Width x Height |
| Small | 7 3/8” x 9 3/8” |
| Small Medium | 8 ½” x 11 ½” |
| Medium | 10 ½” x 14 ½” |
| Tall Medium | 10 ½” x 18” |
| Large | 13” x 18” |
| Tall Large | 13” x 21 5/8” |
| Tall Large Plus | 13” x 25 5/8” |
| Extra Tall Large | 13” x 29 5/8” |
| Extra Large | 16” x 21 5/8” |
| Extra Large Plus | 16” x 25 5/8” |
| Giant | 17 5/8” x 29 5/8” |
Step 10: Separate the pet door into its two halves. Place the inner frame of the pet door (the side with the security cover tracks) in the rough opening from the inside of the house. Install the outer frame on the outside of the door to sleeve together to the inner frame. You should be able to snap the two frames together.
Optional Step: If you choose to use the raincap for your door installation, attach it to the outer frame as shown in the graphic and picture to the left. It should simply hook onto the top of the outer frame. Then snap the frames together as stated above in Step 10.
 Step 11: Using the pre-drilled pilot holes in the pet door frame and the supplied drill bit, drill one hole into the French door with the supplied drill bit through the inside edge of the outside frame at the bottom. BE CAREFUL NOT TO BUMP ANY OTHER PANES OF GLASS WITH THE DRILL BIT. Insert and loosely tighten one screw. Make sure the door is level and adjust if needed. When door is level, tighten the inserted screw and repeat drilling and inserting the rest of the screws in the pet door frame.
Step 12: The King Starboard® security cover will slide easily into place in the built in frame and can be easily locked and unlocked with the positive action pin bolt lock. Remove the drop cloths and clean up the area.
F-3 French Door Basic Installation
Step 5: Remove the molding and glass as in steps 5 through 7 of an F-1 Installation. If you remove more than one pane of glass, cut out the divider between the panes. To do this, cut almost all the way through from one side. Then bring the saw around from the other side to prevent breaking the divider.
Step 6: If you will be cutting into the body of the French door, mark the door where you will be cutting and cut out the rough opening. Do NOT cut closer than four inches from the side or bottom of door (some doors require leaving even more wood than this). Doing so will structurally weaken the door.
Step 7: You should now have your square rough opening cut to size as well as the extra hole above or to the side of the rough opening for your piece of acrylic or Plexiglas. Place the acrylic into the opening and mark where you will need to cut it. Do not remove the protective paper from the acrylic yet! Make sure all cutting and fitting is done before removing the paper as Plexiglas can scratch easily. Cut the acrylic and place it in the French door. Once you have achieved a good fit, carefully remove the paper and put the acrylic back into place.
Step 8: Separate the pet door into its two halves. Put the pet door in place. Place the inner frame of the pet door (the side with the security cover tracks) in the rough opening from the inside of the house. Install the outer frame on the outside of the door to sleeve together to the inner frame. You should be able to snap the two frames .
Optional Step: If you choose to use the raincap for your door installation, attach it to the outer frame as shown in the graphic and picture to the left. It should simply hook onto the top of the outer frame. Then snap the frames together as stated above in Step 8.
Step 9:Using the pre-drilled pilot holes in the pet door frame and the supplied drill bit, drill one hole through the inside edge of the outside frame at the bottom. Insert and loosely tighten one screw to hold it in place. Make sure the door is level and adjust if needed. Measure carefully and cut the molding to fit. Put molding around the acrylic to hold it in place. When nailing the molding back into the door, place paper or cardboard over the acrylic to protect it from the hammer.
Step 10: After molding is installed, tighten the inserted screw and repeat drilling and inserting the rest of the screws in the pet door frame.
Step 11: The King Starboard® security cover will slide easily into place in the built in frame and can be easily locked and unlocked with the positive action pin bolt lock. Remove the drop cloths and clean up the area.
Problem Solving
A word of caution
- French doors are often wood that has been stained and varnished. When cutting into a door like this it is a very good idea to draw a second line around your rough opening about 1/8” outside it. Before cutting out the rough opening, score the outside line with a utility knife. This way, if the wood splinters while you are cutting the R.O. it will stop at the scored line.
- Study the illustrations below. These are good guidelines for F-3 installations
.
GOOD-
Figure 1 – one pane plus part of a second pane vertically
Figure 2 – one pane plus part of a second pane horizontally
Figure 3 – one pane plus part of a second pane vertically and down into the base of the door
Figure 4 – one pane plus part of a second pane horizontally and down into the base of the door
Figure 5 – one pane plus part of a second pane vertically and into the side of the door

BAD-
Figure 6 – one pane plus part of a second pane vertically and into the side of the door (side piece is too narrow)
Figure 7 – one pane plus part of a second pane horizontally and into the bottom of the door (bottom piece is too narrow)
Figure 8 – one complete pane and two partial panes (cutting into both mullions)
Figures 1 through 5 are good approaches to an F-3 installation. Try to avoid situations like Figures 6,7 and 8! WE DO NOT RECOMMEND THESE!
Trying to remove that much of the door would either structurally weaken the door or you would have to cut the mullion so they would fit almost perfectly to the pet door’s interlocking flange, then screw through the flange into the mullions from inside the pet door. This would still be a very weak installation.

F-3 cross section
The figure on the left shows pieces of build-out on
top of the pet door.
The figure on the right shows reused door molding. If necessary, you can set the wood on top of the pet door and nail the molding to the wood.

